Sunday, October 11, 2015

Leopold

Welcome Ghouls, Goblins and occasional Zombienosers!

I've got a real treat for you - I hope. May I present...


Yep, the hookah king in the flesh, ...well, not exactly flesh. He's made of a combination of several materials - I got creative with some help from Home Depot. So grab a paper and pad, there will be plenty of notes to jot down on this one. I hope you'll enjoy....

T'was a dark and stormy night...


Not really. It was the middle of a sweltering summer. Anyway, after my Wizard of Oz series I had planned on doing a series of fairytale characters for quite a while, but this was one I particularly was looking forward to. Last year I had made my version of the Cheshire cat, named "Scruffy" and this was its follow up.

So I started with the large mushroom that the character would sit upon. I cut a short wood block and circular piece as a base armature for the mushroom.  I then proceeded to use "Great Stuff" gap filling spray foam to create the mass of the mushroom's top. You can find this at most home improvement stores like Home Depot.


Below you can see how high it foamed up after I left it alone for an hour or so.


I used a long razor blade and cut the foam into a mushroom shape. It's really a quick and cheap way to build mass. Then I screwed a hole through the bottom of my plaque base and screwed the stem to it. Easy!


Next I drilled a hole through the foam and into the wood stem. Then I jammed a thicker guage armature wire in it and secured it with 5 minute epoxy. I bent the wire forward and positioned it where the torso would sit then sprayed more foam to create the body and tail of the caterpillar.


Since I knew I would attached the arms and head later, I needed to shield part of the wire so I had room to attach them. I simply taped a paper towel around it so the foam would rise beyond that point.


I had the head already sculpted and set it on top after I carved down the foam a bit. It needed more refinement, which you can see below.


When I got it close, I attached the head to the armature that ran through the entire piece and also added some epoxy putty to attach the armature for the arms. He looked pretty wimpy at this point, but I knew I'd be adding some more material to bulk him up a bit. After that, I sealed the foam with an epoxy resin, which would also help to re-inforce the solidity of the piece and make it durable (pictured below, right).


I next cut some soft polyurethane foam and made a form for his chest and upper arms, added his hands (which are made from Sculpey and got a little too hot when baking) and slipped on his would-be sleeves for the hippy outfit I had planned. I was happy and satisfied with the results so far. 


To smooth out the sharp cuts on the foam I glued some panty hose around his belly and torso. It created a funny little collar that I left on longer than I had to because he was looking rather snazy. The black paint on his face is just to fill in the deeper crevasses.


At this point I gave him a preliminary base coat paint job. Then I pulled the panty hose over his head for protection from more foam work I would do. I added folded cardstock paper to act as gills for the mushroom and secured with more Great Stuff foam around the edge of it.


The next step was to even out a lot of the uneven surface. To start this, I added a layer of bondo over the body and mushroom then began the tedious task of sanding. 


Once I got it smooth I went ahead and based out the color, first on the body and hands, then on the mushroom. This allowed me to clearly see how rough it still was and I had to go ahead and add some spot putty to repatch some of the more offensive areas (and I don't mean his private parts). You can see the miniature hookah I built on the bottom right photo.


You know, after a day of sanding you really begin to hate life. This is what led me to go ahead and do the final paint job on Leopold's head. The result was encouraging so I decided I would keep the sanding hell going all the way to the finish line. This revealed some more touch up work I had to do to smooth out the body and mushroom. I used spot putty for these minor adjustments. I also went ahead and drilled a depression in the mushroom where I wanted the hookah to sit coiled in his tail.


After this I went ahead and based out the body and the mushroom again to see how it was looking. I painted some test patterns on his back because at this point I wasn't sure what kind of pattern to use. I also finished the paint job on his hands. I was working on several pieces at the same time so that's why you see the guy in the yellow bunny suit laying in the picture. His name is, "Skippy". 


So I went ahead and painted his body, still knowing I would have to refine the pattern on his back (which is my Zombienose moniker). The next step was to start adding his little hook feet and the grass on the artwork's wood base. I made the little feet with Magic Sculpt and also beefed up his chest a bit with it. Using Magic Sculpt I made little mounds on the base and pushed plastic grass into them. I also drilled a small hole in the base and slid a plastic flower in to fill out the scene. 


Finally, I was reaching the home stretch with this project. Around this time I decided I wanted him to wear a hippy shirt with some kind of vest as he was toking away on his hookah so I enlisted help to fabricate this. The shirt was fitted and looked good, but because the fabric was sheer the arm forms needed to be constructed to hide the armature wire. I painted his chest up to match to his head and body. I also started applying some red paint to the mushroom and blackened the base to visualize the completed piece. 


Once again, I was satisfied with the progress and relieved it would soon be finished. I added a bit of gravel and painted some spots on the mushroom head before I moved on to a set of glasses for my new friend. I made them simply and quickly using these metal curly trinkets I found at Joann's Fabric and Craft store. You'd be surprised at how much frustration can motivate your progress! Anyway, I just cut out the curly middle portion and bent the loop. I also found a bag of doll googly eyes, which I used for the lenses of the glasses.


To fit them I modeled the earhooks with Magic Sculpt and glued each side on before I bent an extra curve to use at the nose piece. The plastic doesn't actually magnify his eyes but the curvature distorts them enough that it appears to. 


Unfortunately, I didn't document the Hookah build as thoroughly as I should have. The base and body were simply made with miniature ceramic and glass bottles that were permanently attache together. The top portion was made with a couple of 1/12 scale plastic drinking glasses glued end to end. The flower dish was in a pile of trinkets I had and the finishing touches were done with other parts like the ball chain made for ID bracelets used for the trim. Looking down upon the caterpillar, you can also see the details of the pattern I painted on his back. Note: the hookah is NON-functional!


Nearly complete, I simply added more gravel by applying 5 min epoxy to the base and tossing the gravel onto it. I painted it to break up the color and added a few pebbles and rocks too. The final touch were the drawer handles I added in order to lift the artwork without actually touching any of the details. 


And finally... after all of that.... it was done. Don't smoke or you'll turn blue, kids.


Ta-da!


Here's the video:


THE LAST TIDBIT:

Also, please feel free check out my friend's short film on Youtube:


Friday, May 8, 2015

Oil Can!

Today we're off to see the wizard! The man behind the curtain - namely, yours truly.

I'm going to layout the process for how I made my own version of the Wizard of Oz's Tinman character. I had no yellow brick road to guide me, but I did have a deadline for a Wizard of Oz themed art show and this is what I came up with. So strap on your ruby slippers and grab your oil can - We're off to see the process of the wonderful Zombienose of Oz!


Since I had decided to make each of the principal characters from the Wizard of Oz the first step was to create a frame that would unify them. This is a bit of a process so please bear with me.

I used a cake pan to set the shape and sculpted the circular frame with Chavant oil based clay. The pan also served the purpose of blocking the hole so the piece could be molded easier. 


As you can see, after I completed the frame's form I roughed in the shape of the Z and gave it a dimensional shadow effect along the side. Hopefully you will notice that the opening in the frame itself is intended to be a large "O" and it spells Oz. When I was satisfied with the "Z" I scratched in some texture all over to give the frame a wood grain appearance and finally added my Zombienose symbol on what will be the bottom side of the frame.


Next, I molded the frame with silicone and an Ultracal jacket. After the mold was cured and removed I poured a fast-cast resin then trimmed out the excess with an X-acto knife. I cut some plywood for the backing then attached it. The inside was spray painted black and I have painted the frame with a not-so-emerald green. I made this compilation photo below to illustrate the process below.


Ok, now that's finally done! Let's get to the good stuff. 

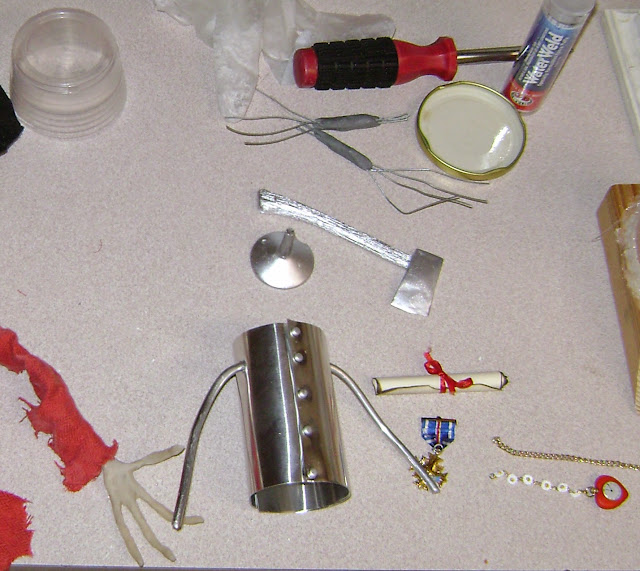
One of the first parts I made for the Tinman was his axe. You can see the armature wire grasping the axe handle in this picture below. The wooden sign in the center of the photo was made for the Cowardly Lion sculpture.


I essentially made his body by cutting it out from a thin sheet aluminum you can buy at a hardware store. I made a crude armature and wrapped some epoxy putty around it so I would have something to mount the piece into the back of the frame. Then I wrapped the cut aluminum around to make the torso. I punched some slits into the front and slid paper fasteners brads through them to appear as buttons. So now you know - he's the aluminum man, not tin. Below you can see his funnel hat along with the wire armature for his hands.
 

Then I wrapped those aluminum sheet pieces around in segments for the arms. 


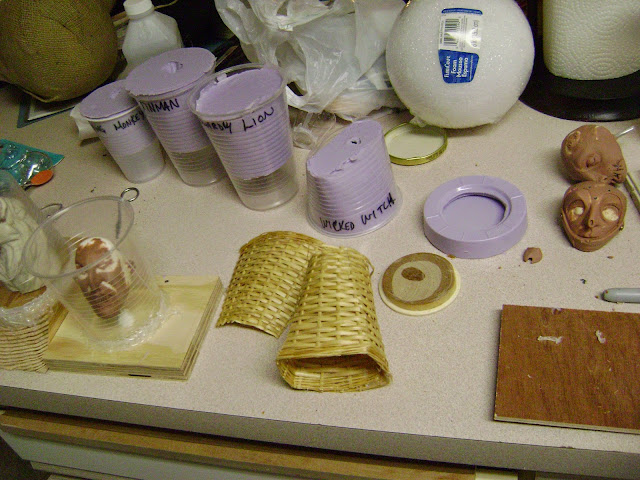
I sculpted the head using Chavant (the same clay used for the frame) and molded it with silicone.


I molded all of the character's heads at the same time. My workspace was a mess and looked like it was hit by a tornado!


I then cast a copy of his head using resin and painted it with chrome spray paint. I  added some black to get an idea of what it would look like. Also, I glued on some small plastic jewels to serve as miniature rivets.


I created all of the characters at roughly the same time. I put them together to get an idea of how they would look.


To make his hands I used some epoxy putty and armature wire. I covered the epoxy putty with more pieces cut from the aluminum sheet then drilled some small holes and pushed tiny nails into them to appear as more rivets in his hands. I then slipped heat shrink tubing over the fingers and cut notches out of the tube to be the finger joints. I attached his funnel hat which I cut with that same aluminum sheet as well as his lower jaw. He's also got his ticking heart at this point, which was a holiday tree ornament.


At this point I began to construct apples using Super Sculpey. Below you can also see the Tinman's pelvis and thighs. My characters usually don't have legs because I like to think of them as spectors but sometimes I must make exceptions.


After painting up the apples I wrapped their wires around the branches I made. To make the branches I used a plastic bouquet of tiny ivy-looking leaves in which I built the bulk of the trunks up with Magic Sculpt. I then cut each of the ivy leaves into apple tree leaf shapes. This was very time consuming. Clicking my heels together three times may have been faster but I didn't have that option. 

Then I painted them.


The last thing I had to add was some prop boulders. I carved them from foam and spraypainted them. The effect worked well enough.


A last minute addition was a small spot of grass I wanted to add to the lower inside of the frame. This was made with fake black fur which I painted green.


Before I finalized the piece and mounted all the parts I added gold to the frame's green color in order to highlight the word "Oz" and some blueish shadows to his face. I also added gloss to the apples so they would shine and some rusting color to the Tinman's body.


I glossed the eyes and the piece was done. 


Hope you enjoyed! Thanks for reading, I appreciate your support. Anyway, the fellows were looking fine together. There's no place like home.


TADA!!

THE LAST TIDBIT:

Please check out the new music video from Malderine featuring my halloween bird costume!


Tuesday, March 17, 2015

Batten Down The Hatches!!

Welcome aboard the poop deck!

Ladies and gentlemen, toys and squirrels, today we have the exciting account of the gloomy events that led to the attack on the good ship Lollipop and Capt. Red Beard. So, batten down the hatches! This is how my artwork "Ahoy!" was made.


They say the captain always goes down with his ship, so first things first - I had to incorporate some sense that he was actually aboard a vessel. I accomplished this by suggestion, merely adding a mast and rope ladder. I used some rope-like string and knotted it up to look like this:


To get a visual blueprint of what I wanted I laid out the bare pieces. All hands on deck! In this case, all tentacles. I wanted the tentacles to wiggle and puppeteer the figure's arms as he held them. Three of the tentacles were pre-mechanized so I had to add a hub to power them with a single power source. The hub is stowed away and hidden under the captain's coat. I apologize for the poor quality of the picture. I threw my old camera overboard already.


Next, I sculpted and painted the head, attempting to give him a look of knowing fear. Also, I attached his sweater which I made from a scrap of fabric. Below you can see I began to add his beard whiskers. 


I attached a little more and checked his look with his hat. I had yet to paint his eyes.


I attached the hair in a specific direction to emulate a hellish wind storm blowing through it!


He looked pretty cool bald, but I wanted to add my moniker to his captain's hat so he was going to wear it regardless dammit. 


Almost ready to swab the deck! After finishing attaching the hair I trimmed it down a bit and scorched it very lightly with a small torch. This causes the plastic hair to shrivel and curl, giving it a more realistic pattern and look. 


I didn't want this guy to walk the plank to his final doom while he was still blind so I went ahead and painted his eyes. 


I forgot to mention that I sculpted his hands with Super Sculpey and posed one to hold onto a tentacle and the other to hold against his face as he calls for help. But in the Zombienose universe there are no happy endings. Sorry, Charlie.


I sunk the figure into his frame and made sure the electronics would have enough room to be stowed. He already looked like he was trying to escape before I added the tentacles.


Holding course due South, I had to navigate a latitude and longitude for the tentacles to be placed. You can see below where I had already redressed the skin of the tentacles and made them red. I also altered their curves a bit.


Next up I added my Zombienose moniker to his Captain's hat. I simply made it with a black piece of fabric with some gold thread glued onto it to resemble my moniker. Then I had to add the mast. I placed the tentacles where I thought they looked good (for now) and drilled some holes where the rope and mast parts would penetrate through the frame. Then I slid in the wooden dowel that I was going to use. As luck would have it, bad luck that is, it was too small!


So I used a larger gauge and inserted a crossbar to support the rope ladder. This looked better so I removed it and painted it before I permanently attached it. 


This was coming along nicely. I then realized I was going to have to cut out a section on the opposite side of the frame so one of the tentacles could be moved over a bit and give the Capt. a little more room to wiggle when the electronic movements were turned on. You can see where I removed the paint and sanded it (the white area on the inner edge of the frame). Please don't mind the dust on his coat. I was almost done and at this point of the process it was sink or swim.


Now I spotted this project's end just 10 degrees dead ahead! I secured the Captain's coat to look as if it was blowing in the same direction as his hair. All that was left was to secure the figure and make sure the electronics worked ok. I positioned all parts and took some photos with some different lighting. Behold.


Ahoy! I posted a link to my YouTube channel where you can see the video I made of the tentacles at work: https://www.youtube.com/watch?v=f8v5iE0F820&list=UUAJ81O55ELcyQmn_PGn1vLw

The Last Tidbit:

Please follow me on my Twitter
https://twitter.com/zombienose

Or on Instagram:
https://instagram.com/zombienose/

Or on Facebook:
https://www.facebook.com/Zombienose

Or on YouTube:
https://www.youtube.com/user/zombienosecollection

Or on Tumblr:
http://zombienose.tumblr.com/