
I'm going to layout the process for how I made my own version of the Wizard of Oz's Tinman character. I had no yellow brick road to guide me, but I did have a deadline for a Wizard of Oz themed art show and this is what I came up with. So strap on your ruby slippers and grab your oil can - We're off to see the process of the wonderful Zombienose of Oz!

Since I had decided to make each of the principal characters from the Wizard of Oz the first step was to create a frame that would unify them. This is a bit of a process so please bear with me.
I used a cake pan to set the shape and sculpted the circular frame with Chavant oil based clay. The pan also served the purpose of blocking the hole so the piece could be molded easier.

As you can see, after I completed the frame's form I roughed in the shape of the Z and gave it a dimensional shadow effect along the side. Hopefully you will notice that the opening in the frame itself is intended to be a large "O" and it spells Oz. When I was satisfied with the "Z" I scratched in some texture all over to give the frame a wood grain appearance and finally added my Zombienose symbol on what will be the bottom side of the frame.

Next, I molded the frame with silicone and an Ultracal jacket. After the mold was cured and removed I poured a fast-cast resin then trimmed out the excess with an X-acto knife. I cut some plywood for the backing then attached it. The inside was spray painted black and I have painted the frame with a not-so-emerald green. I made this compilation photo below to illustrate the process below.

Ok, now that's finally done! Let's get to the good stuff.
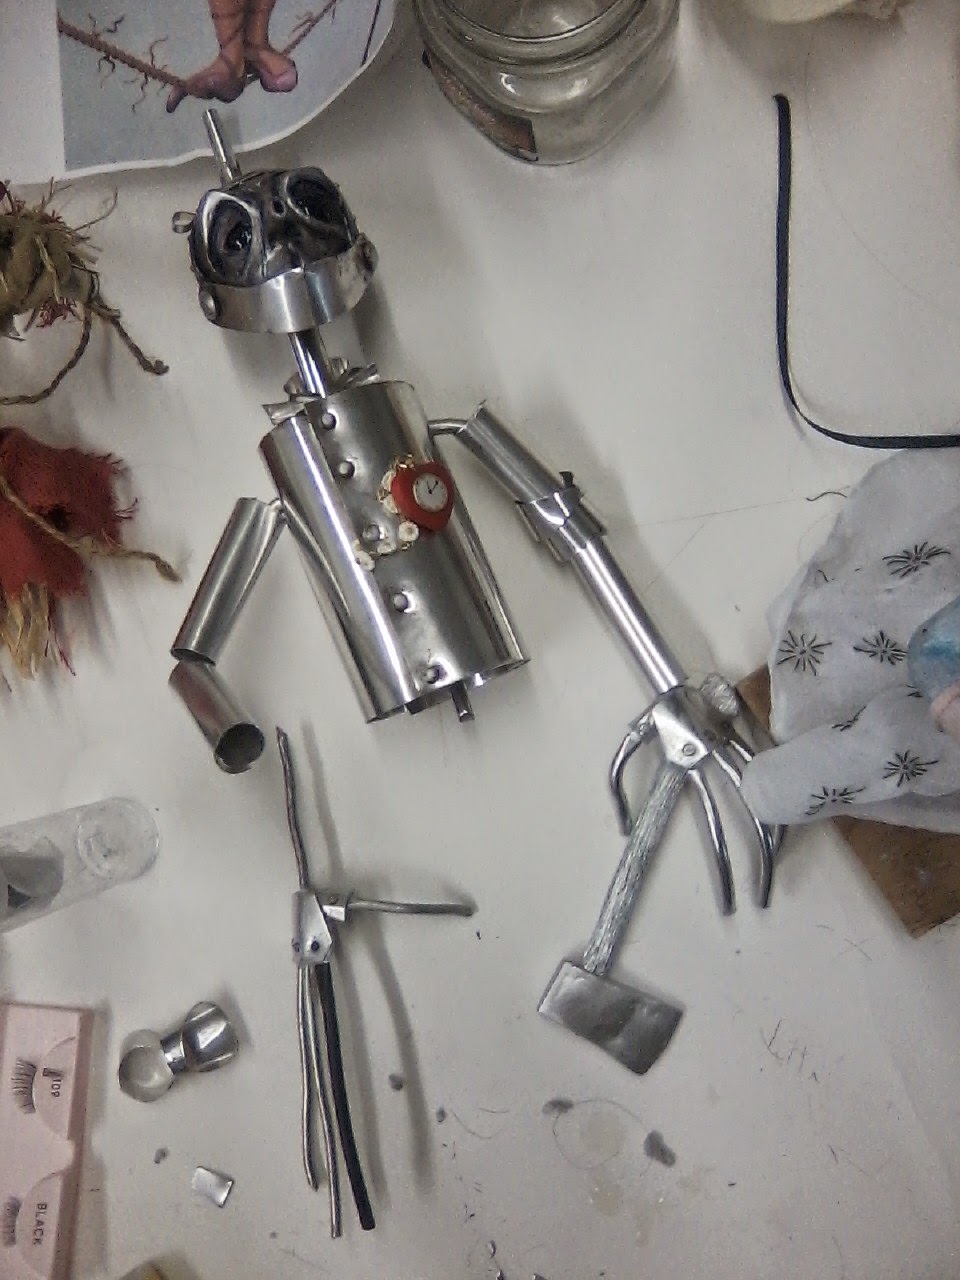
One of the first parts I made for the Tinman was his axe. You can see the armature wire grasping the axe handle in this picture below. The wooden sign in the center of the photo was made for the Cowardly Lion sculpture.

I essentially made his body by cutting it out from a thin sheet aluminum you can buy at a hardware store. I made a crude armature and wrapped some epoxy putty around it so I would have something to mount the piece into the back of the frame. Then I wrapped the cut aluminum around to make the torso. I punched some slits into the front and slid paper fasteners brads through them to appear as buttons. So now you know - he's the aluminum man, not tin. Below you can see his funnel hat along with the wire armature for his hands.

Then I wrapped those aluminum sheet pieces around in segments for the arms.

I sculpted the head using Chavant (the same clay used for the frame) and molded it with silicone.

I molded all of the character's heads at the same time. My workspace was a mess and looked like it was hit by a tornado!

I then cast a copy of his head using resin and painted it with chrome spray paint. I added some black to get an idea of what it would look like. Also, I glued on some small plastic jewels to serve as miniature rivets.

I created all of the characters at roughly the same time. I put them together to get an idea of how they would look.

To make his hands I used some epoxy putty and armature wire. I covered the epoxy putty with more pieces cut from the aluminum sheet then drilled some small holes and pushed tiny nails into them to appear as more rivets in his hands. I then slipped heat shrink tubing over the fingers and cut notches out of the tube to be the finger joints. I attached his funnel hat which I cut with that same aluminum sheet as well as his lower jaw. He's also got his ticking heart at this point, which was a holiday tree ornament.
At this point I began to construct apples using Super Sculpey. Below you can also see the Tinman's pelvis and thighs. My characters usually don't have legs because I like to think of them as spectors but sometimes I must make exceptions.

After painting up the apples I wrapped their wires around the branches I made. To make the branches I used a plastic bouquet of tiny ivy-looking leaves in which I built the bulk of the trunks up with Magic Sculpt. I then cut each of the ivy leaves into apple tree leaf shapes. This was very time consuming. Clicking my heels together three times may have been faster but I didn't have that option.

Then I painted them.

The last thing I had to add was some prop boulders. I carved them from foam and spraypainted them. The effect worked well enough.

A last minute addition was a small spot of grass I wanted to add to the lower inside of the frame. This was made with fake black fur which I painted green.

Before I finalized the piece and mounted all the parts I added gold to the frame's green color in order to highlight the word "Oz" and some blueish shadows to his face. I also added gloss to the apples so they would shine and some rusting color to the Tinman's body.

I glossed the eyes and the piece was done.


Hope you enjoyed! Thanks for reading, I appreciate your support. Anyway, the fellows were looking fine together. There's no place like home.

TADA!!
THE LAST TIDBIT:
Please check out the new music video from Malderine featuring my halloween bird costume!
