So what's the BIG idea?
A year or so ago my friend Chet invited me to participate in the annual group art show "Conjoined 3D" at the Copro gallery in CA. I've been encouraged to make a large piece by various people for years so I finally succumbed to peer pressure. Because this was a larger project this blog will contain some technical jargon that might be a little more complicated than usual, but I'll do my best to walk you through it. So read on, if you dare...
I did a quick sketch to lay out some sort of blueprint of what this art piece would consist of but along the way, things changed. As you can see in the following photo, I first thought of using a welded metal understructure, but threw that idea out when I realized that this would have to be a collapsable and portable art piece. Eventually I settled on using a large tripod intended to support amplifiers.
To begin, I used a large styrofoam ball as a base. I mounted it on a metal post and jammed a wooden dowel in where the nose would be. Next, I covered it with "Great Stuff" - a spray foam for gap and crack filling. It foams up after you spray it.
Once I had covered the entire head I carved it down into the shape I wanted. Then I covered it with Bondo (body filler compound for auto body shop repair) to firm up the form so when I pressed clay onto it the foam wouldn't collapse into itself.
To make things easier I laid out some large craft paper and sketched out the body to serve as a guide to compare as I built the figure. For the hands, I cut scrap plywood into a palm shape and attached 1/4 inch armature wire to it with some cable brackets. Then I secured them to another PVC pipe at the wrist.
In order to build bulk without making it heavy I decided to use a large cardboard tube as the trunk of the body. These tubes are building materials used for pouring concrete into and you can find them at Home Depot. I added another plywood base where the waist of the character would be. I hoped this would act as an area to twist the upper body for posing. So far it was lining up to my craft paper schematic pretty well.
I drilled a hole in the center of the waist plywood piece so I could slide another PVC pipe down through the center of it. I wanted the arms and neck all to be supported from this piece. Underneath the waist I attached some make-shift L-brackets that would lock it to a PVC pipe. This pipe would slide onto a large tripod allowing me to dismantle and reassemble the piece easily and quickly.
At this point I used an old xmas tree stand to hold the figure upright. I drilled some holes into the side of the cardboard and inner PVC to lock in another PVC pipe to serve as the shoulders. Then, to give more form to the body, I attached a sheet of mattress foam to the tube using spray adhesive.
I test fitted the central body PVC pipe onto the tripod and it fit nicely. Then, I used a heat gun to soften the arm pipes and bent them into position. Finally I put it all together and to see how tall I could get it. It was easily 10 feet tall!
When I had the body form ready, my costumer was able to get a rough outfit together so we could see it's progress. The length of the dress material is ultimately what would determine the hieght of the art piece, which was close to 8 feet tall. I placed one of my rubber Zombienose masks on for reference and used a halloween store's cheap feather headdress as a collar mock up. All was looking quite swell! I wrapped the plywood on the hands with aluminum foil so they wouldn't absorb all of the water from the water based clay that I would sculpt them with. Then I handed off the body form to the costume department to get started on the gown because I had to finish the head and hands!
I refined the pose of the hands and slapped some clay on, using my own hands as reference while scultping. Becase this figure would be so large the hands were also sculpted oversized.
After covering the rest of the head with Bondo I shaved down any sharp or high points and lay some clay on. I also secured a PVC pipe over the metal rod. Then I slapped some WED clay onto the form and began to sculpt the beginning stages of the oversized head.
During the process of sculpting I added two metal rods into the head and inner PVC. These would serve as key points to lock the core into the negative of the mold during casting, allowing the core to be centered every time and providing a uniform thickness of the final silicone skin. I was pleased with the finished sculpture and was ready to mold it!
For the head, I wanted to create a Matrix mold. This meant that there would be a rigid outer shell and separate flexible inner portion. This is because I hope to produce fiberglass copies of this head for display outdoors in the future. If the mold was rigid I could not produce a rigid copy because it would become locked inside the mold during casting due to undercuts. An inner silicone portion of the mold would allow me the choice of casting a rigid piece because it can flex and relieve undercuts.
Before I began, I wrapped the sculpture in cellophane. Then I sliced half inch slabs of White clay and laid them on over the sculpture. This layer of clay represented the area where the inner silicone mold would be poured and create a surface for the case mold to be initially made. The purpose of the strips of clay you see would be as keys to help register the inner flexible part of the mold into the rigid case mold.
Because the mold casing would have to be made in separate parts I cut some shims from a roll of thin aluminum sheet metal. I used foil tape to seal the separations and gaps. There would be 3 parts of the case mold - the front, back and bottom cap.
I cut the fiberglass matting into small squares and applied it until I covered the entire front half. I built up several layers until it was at least 1/8 of an inch thick and also added two metal bars to act as handles for pulling apart the mold.

After trimming off the sharp edges from the flanges of the mold I repeated the same process for the back half and bottom cap. I then pulled off the rear part of the fiberglass case mold and cleaned out the clay layer with the strips. I also removed the cellophane from the back half of his head. After that I drilled holes for bolts to be fitted all the way around as well as smaller 'bleeder' holes to help air escape as it filled. I also drilled a hole in the back of the head area of the case mold. When pouring a large mold of this type it's a good idea to have another hole drilled so the air has some release as the case fills with silicone. In the following picture you can see the other hold I drilled on the bottom cap for this reason. And as it fills, you simply plug the holes with bits of clay or screws so it will not all leak out!
Now that the prep work was done I bolted the parts together and temporarily attaced a cardboard spout into that hole and applied plaster bangages all along the seamline of the mold to prevent any silicone from leaking out. Finally I poured silicone (the blue stuff) into the spout and let it cure.
I repeated that process for the front half and the bottom cap. You can see that each half was a different color. That is because I ran out of silicone and had to buy another kit after I finish the first part I molded. Then I proceeded to remove the scultpure and clean the mold.
When I got all of the clay and residue cleaned out of the mold and off the core, I sprayed the Great Stuff foam into the mold and reset the core into the mold and closed it up. After that foamed up and cured I opened it up and had a foam copy of my sculpture!
I then shaved down the surface of the foam. This would create a core that would displace the silicone I cast and allow for a fairly uniform thickness of skin.
Before setting the core back into the mold I painted a layer of silicone all over it. I accelorated the catalyst so it would cure quicker. This layer would seal the foam and prevent any air bubbles from floating out of the core when I cast the silicone skin. You can also see how the metal rods mounted in the head act as keys to secure the core into place. You can also see that the ears would be solid silicone so that the final product could retain it's translucency and look more realistic.
At this point I finished sculpting the hands and prepared them for molding.
I followed the same process as before except I did not make Matrix molds for the hands. I first made a mixture of bondo and fiberglass resin so I could brush on the surface layer and maintain a more viscous layer. Because I accelerated the mix it began to cure. I then applied several layers of fiberglass matte and resin to back it.
With all of the molds made and holes drilled I was ready to cast!
So I went ahead and mixed pigment into my translucent silicone using powder pigments and cast the parts. They all turned out very nicely and only required minimal clean up - mostly just flashing along the seam lines.
I trimmed off the flashing from the seamline on the head and put the whole thing together again so see how it looked. Tthe arms needed to be reposed and reinforced so the weight of the silicone wouldn't cause them to fall out of position.
You can view a short video clip of the silicone casting by clicking
HERE.
So I reinforced the PVC pipes at the elbows by coating them with a layer of Free Form Air epoxy dough and a layer of fiberglass. With the arms in their final pose I put the figure together again for review.
I needed to start on the staff so I did a quick test with a resin skull mounted to the end of a fancy curtain rod. The final skull would be cast in transparent resin.
You can view a short clip of the body and staff test
HERE.
I wanted the staff to be more elaborate so I began building a section to branch out. I bent a thicker gauge aluminum rod into shape then hammered some texture into it.
To add more detail to the staff's headpiece I used jewelry and trinkets, creating a semblance of something royal, I hoped...
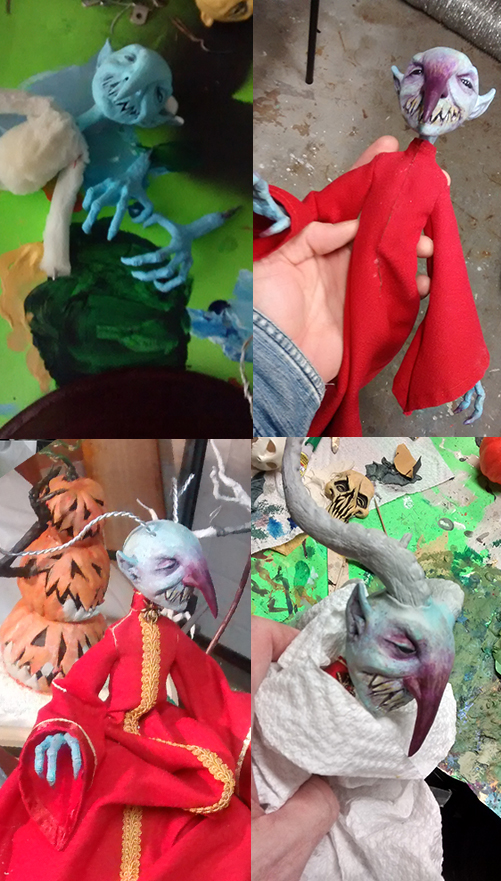
I decided to set that aside and return to working on the head. I brushed on a red layer initially, then wiped it off leaving it in all of the deeper parts of the detailing. Next I spattered and airbrushed some blue to make it more meaty looking.
After some more colors and time painting this is what I ended up with. The final touches would be glossing over the eyes and adding hair.
I moved onto painting the hands and placed them on the body to see what they looked like. I also wrapped some mattress foam around the arms and covered them with duct tap to give them some form.
Here's some closeups of the painting.
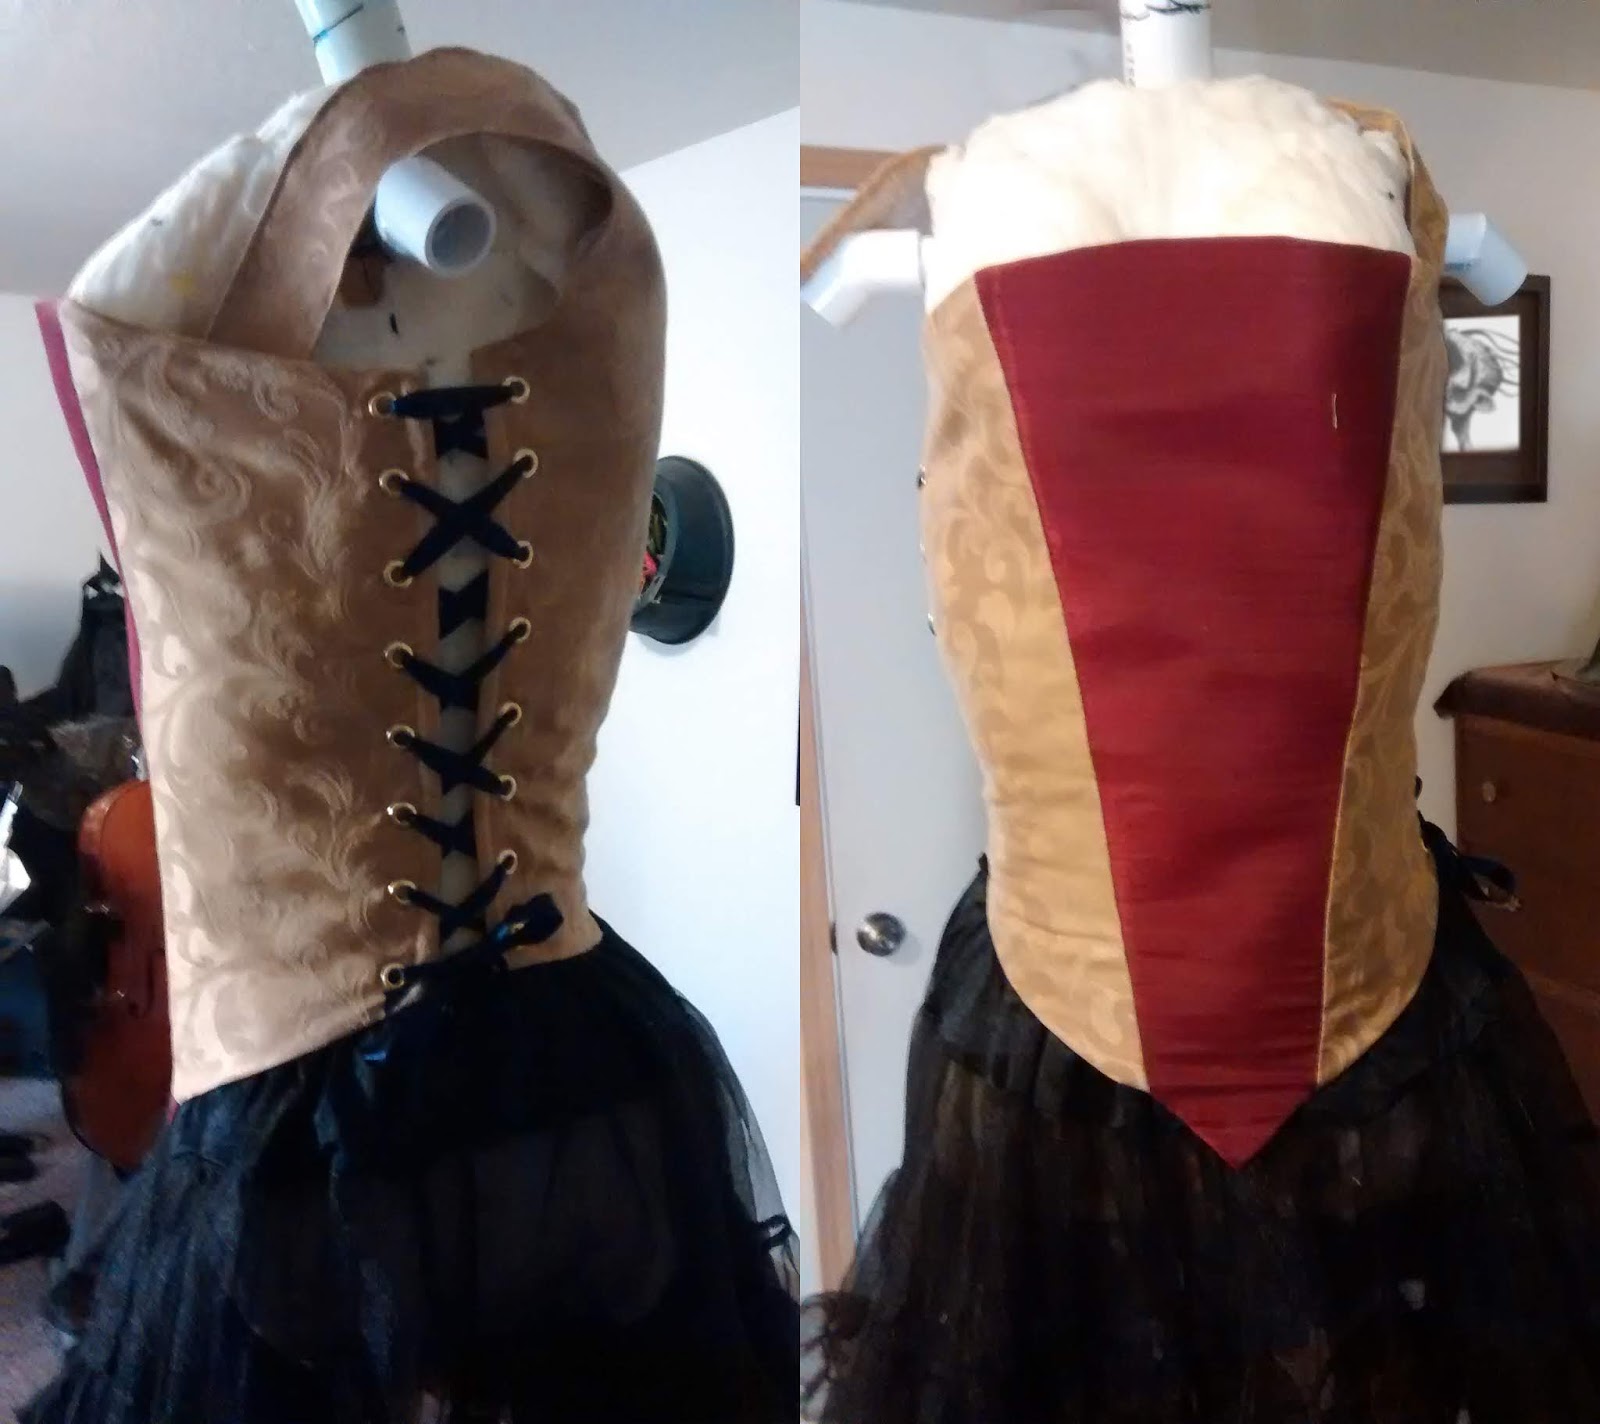
Meanwhile, the costume department was busy making the character's attire. This would really set it off and looked fantastic! Because I was painting the hands for a good part of the time the sleeves would have to be made last. Using red drapery and tapestry materials would ultimately give the piece a very elegant look.
Originally I had thought that the lacing would be across the front, but this looked much better! It was coming along fine and I just needed to adjust some of the lumpy foam that was underneath.
The piece was looking impressive. Even without arm forms things were coming along splendedly. Sleeves and shoulder puffs were pinned on for a more complete look. Also, I had this intricate neck piece that I thought would help blend the head into the costume, but I decided I didn't like it. In the end I asked if it could be placed on the back to add some decorative detail behind the costume.
While the costume continued to be worked on I made a fingernail form to use as a form for vacuum forming the fingernails. I used a small dental vacuum forming machine to do this.
After making eight of them I trimmed and fit them into place. They were painted with actual fingernail polish and I used a silicone adhesive to glue them into place.
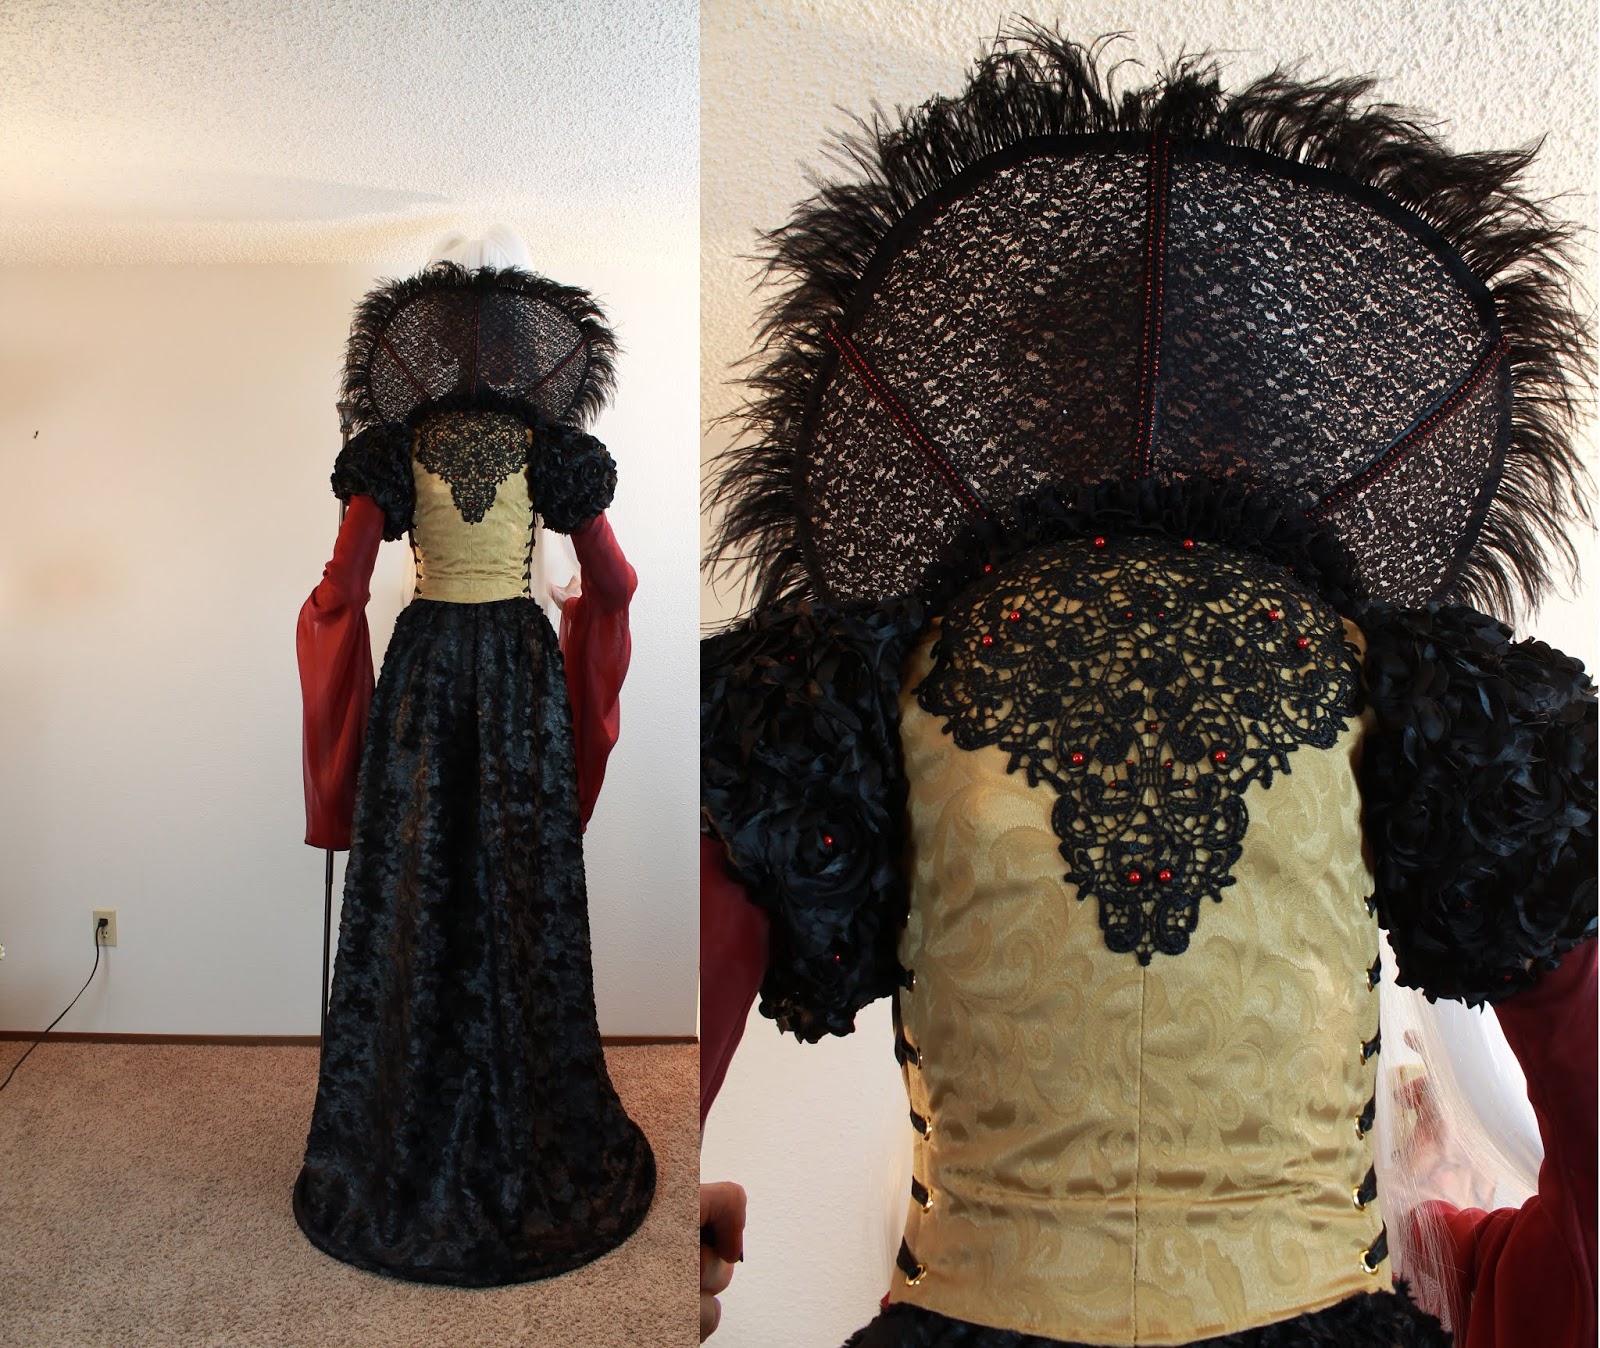
It was time to give her some hair. I bought two white wigs with extra long ponytails to accomplish this. To start, I split the wigs up the back so they would lay flat on the oversized head. Even just testing this I really liked the way it looked. The next step would be punching the hair in at the hairline for more realism. Her ponytails were equipt with clamps and could be easily unclamped while disassembling. In addition, my costumer finished the final version of the collar and it was much more impressive than the cheap halloween stand in we were using. It was built with a wire ribbing frame with lace sewn over it. The feathers were finer and the lace was dabbled with red beads to add more details. The neck choker was a costume piece and I put a red stone in as the center piece to make it stand out.

The ponytails were tied with bands to prevent the hair from tangled while I pulled it on and off. The hair was still flat because it was just laid onto the head, but everything was on course. The corset part of the costume was complete, while the shoulder puffs were still pinned on awaiting their arms. Her collar could be fastened with loops onto buttons attached to the torso and this worked out well for quick assembly or disassembly. Around this time we began experimenting with some sort of crown piece. It's faintly visible in the following pictures. You can also see that the top of the head was up against the ceiling.

Next we added the skirt and awaited the arms and sleeves. Another thing we added was a weighted hoop at the bottom hem of the skirt to keep it down and in place when she's assembled. The skirts wrapped around her waist and were fastened with snaps. As she went together her character really began to manifest. The costume looked quite sharp and I feel I got lucky with the body proportions.
For a laugh I set her up next to my halloween costumes from the past. Though her hair hasnt been properly punched or styled you can see the inner sleeve on her arms, which covers the foam and duct tape I built the arm form with.
So I went ahead and punched in the hair along the hairline. This added some more realism and the hair didn't look flat anymore. I also attached some very nice earrings.
Next, I finally finished the head piece to the staff and painted it so it would appear to have been forged. The head pieace could easily be screwed on or off the staff for travel or storing.
You can see a short video of the head piece by clicking
HERE.
With all of the parts complete we put her together. Behold! I give you Swan Song!
To see a short video of the details click
HERE.
The figure's shoulder puffs were stuffed and drapping sleeves were sewn onto the arms. They included snaps to attached them when assembling. Her crown was completed with red ribbons along the top and bottom, then accented with red beads. I'm very grateful to my costumer for a job very well done! The detail of the dangling black beads and ruffles across the cheast only added that much more elegance to the character. One of the final touches were some rings - I used more old jewelry parts to fabricate some rings for her oversized fingers. Finding colors and styles of jewelry to suit the design was a minor problem but it worked out just fine.
Here you can see the details of the collar and the back of her costume a bit more. The shoulder puffs were accented with red beads, as well as the ribbing on the collar and the back lace piece.
It was finally time to dismantle her and send her to California for the show! All of the planning seemed to pay off and she was ready! At the show she looked even more regal in the gallery lighting.
To see a short video of the figure at the gallery click
HERE.
This concludes this edition of The Inner Workings. Thanks for joining me on this trip down memory lane! I hope you enjoyed reading about the journey of Swan Song, or at least enjoyed the pictures. Please stick with me and subscribe or follow Zombienose on your favorite social media platform - links near the top of the page. Thanks again!