
Well, I guess since we're all stuck at home during this world wide pandemic so maybe you're bored enough to read a new addition to a loooong overdue Blog post. Here you go...


Ok, it breaks down like this:
I cut a thin piece of plywood into a circle and screwed a short 2 X 4 to it. I then hot glued a block of styrofoam to it, cut it in half and used Great Stuff spray foam to build up the bulk. This kept it light weight and provided a mound for the wooden throne. Once that was set I carved it into shape and laid some moss around it. I know you're thinking, 'what a mess!'. It was but I was satisfied with the beginning steps.

Next I made the props. I sculpted the bird bodies using Super Sculpey, painted them black, then glued feathers on. The crow's red eyes are translucent red beads. I also made some Sculpey pumpkins with a wired stem and cut some wood scraps into tombstones, which I covered with plaster to carve into them.

I sculpted the figure's head using Magic Scuplt epoxy (wear gloves!) and used Sculpey Firm for it's hands. They were assembled together with armature wire and I attached and trimmed some scrap foam to give his body some form. After painting those parts I drilled holes in the head and dropped some more armature wire to anchor the horns in (also sculpted with Magic Sculpt epoxy). My brilliant costumer helped fabricate the long red robe.
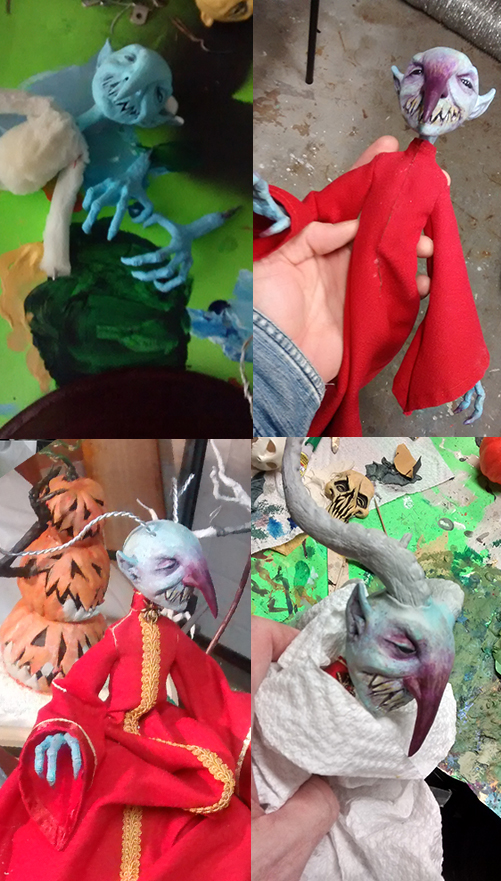
Next up, I prepped the props so that I could just jam them into the foam mountain and secure them with 5 minute epoxy. I used rivets on the bottom of the pumpkin and armature wire on the bottom of the gravestones. I also painted on the parts.

Back to the Hill part! I used armature wire to fashion a thrown shape then used more Magic Sculpt to make them appear to be as branches on the peak of the hill. At the same time I coated the surface of the hill with sand and painted it to look like soil. After sizing it to the figure I painted and dressed the throne with vines and attached one of the crows. It was time to add the tree! I created using the same methods I implemented before- armature wire framework and Great Stuff canned spray foam to create the shape.

When I was satisfied with the tree's form I carved out of the foam I applied more Magic Sculpt to add detail. You can use 99% alcohol to smooth the epoxy putty to give you more sculpting control. When that dried I threw on a base coat of ultramarine blue paint. I also spray some texture onto the dirt elements to give the soil more variety before repainting it. And the crows seemed to have landed on the branches when I wasn't looking... Below I've added a picture from behind so you can behold the crooked trunk of the tree. The home stretch!

All that was left was gluing down parts and painting them. Yay! I decided I wanted more detail on the robe and that it should blend into the soil, appearing as if the demon grew from the hill. I glued on a vine styled embroidery and glued the vines into it. Along with adding more dirt and leaves I felt this sold the effect successfully. Did it?


Thanks for reading and I hope you enjoyed it! Until next time...
THE LAST TIDBIT :
Please check out my friend's awesome art world - http://www.hasanistudios.com/
