Thursday, March 31, 2016

I'll Get You My Pretty...!


Ok, this one's another doozy so click your heels and get ready for another stroll down that yellow brick road! To begin, I threw down a quick layout sketch to visualize how the piece would fit into one of my custom frames. I also thought it would be neat to add some lighting elements to the piece and have a functional hourglass that you could remove from the piece and flip to restart. This was going to be a load of work so it was going to take some planning. But when I did my first sketch I made the unforgivable mistake of forgetting the Flying Monkey! After all, every good villian needs their minions. So I rectified this in Photoshop...


To start the build I had a couple of different ideas for the witch's look, as you can see below. In the end, I decided to stick with my original idea and use the long nosed version. The other sculpt became my Bride of Frankenstein from my art piece "Nevesta". (You can view my blog about making Nevesta by clicking HERE). But do that later! We're just getting warmed up!


I sculpted all of the Wizard of Oz tribute heads with Chavant clay. If you want to see the Tinman's process you can check that out by following this link HERE.  Below is a picture of all of the heads being molded with silicone. 


Not sure if I mentioned this, but I was making all of these characters at once. I made all of the other costumes myself, but my helper made the Witch's exquisite outfit for me.


Now here's a test fitting with the costume. The body it simply armature wire with epoxy putting holding the arms on. I filled out the body with foam. The hands are made with Super Sculpey over wire armature. You can also see the flying monkey's hands and armature behind the Witch body to the right.


The rest of the parts were on another table. You can see the cape along with some other elements. I also finished the broom prop, but needed to paint the colored stripes on the handle. The green tape is masking off the areas I don't want paint on. I used an empty glass snowglobe for the crystal ball and the base that held the ball was cast with resin. You can also see the circuit board that would operate all of the lighting elements.


I placed the head on the body to see how she was coming along. Orange hair?!? Are you crazy?


This was the preliminary green paint job. Next to her is the Cowardly Lion in progress. That was a bright green base coat. She's greener than grass! Take it down a notch, Zombienose!


And so I did. I went ahead and finished my initial paint job with a blue nose. I liked it for a few seconds, then wanted to dowse it with a bucket of water. I was unhappy with it so I decided to redo it later after I worked on some other parts of the piece. 


Monkeys are distracting, so I moved on. Here's just a rough sketch and a closer look at what I had planned for the monkey. 


I sculpted the head and cast it in resin. He looks bare without fur, but that would come later. Next I made an armature body for him.


I used epoxy putty to secure the Monkey's head on and gave him some wing forms to glue very small black feathers to. I hollowed out the head of the Monkey and placed lights inside for his eyes (see the wire?).  Anyway, I put a base coat of paint on him, but this little guy was going to need a lot of hair and feather work!


In this photo you can see where I started placing the feathers onto the Monkey's wing. Also, this is a nice record of the early stage of the crystal ball, before it was painted gold. I sculpted the winged monkey once and molded it with silicone putty. Then, when the mold was cured, I pressed more Super Sculpey into the mold and made several more. Look! The crystal ball is empty! ...just like my energy level. I took a break and thought of another idea. 


I thought it would be neat to add some more lighting elements into the piece. Now I planned to place a small green light in the crystal ball to illuminate an image of Dorothy. I sketched out my plan...


Are you still reading this? Okay, here's what happened next: I glued some hair onto the Witch's head. Pay no attention to the cat behind the curtain! (in the background) I went with black and decided to place a streak of orange along the sides.


Here's a better look at the Orange streak and the completed paint job on the broom.


Then I cut an oval from a thick matte board and stared at it. I stuck the broom in the Witch's hand for effect and laid on a temp version of the Monkey's vest.


At this point, I know what you're thinking: How about the castle? Where's the castle, you idiot? These things aren't just going to float around in space and defy gravity are they? 

Well, yes they are. All done. I hope you enjoyed the blog. Til next time...!

Just kidding. But this was an elaborate piece and fitting all of these pieces into this frame was going to be a tight. Let's get back to the Monkey. It was time for this little guy to man up and grow some fur... and a tail. I dyed some synthetic white fur gray I bought from Joann's and began to attach it to the armature. 


After getting the bulk of the coverage on, I still needed to blend the fur onto the hands, as well as fill out the neck. Then after all of that I would dress the fur onto the head. Grooming a monkey is hard work!


Then, with a rebel yell, I gave him his mohawk! I also dressed his neck with fur and attached his hat. This soldier was shaping up quite nicely! But where's his costume?


Oh, there it is... I made the vest by pasting fabric over a cardboard pattern I made for the little fellow. The slits were needed to fit it onto the Monkey's body, since I already attached his large hands before his costume was done. The red and yellow trim is string that I glued on in a pattern.


I layed all the pieces out to see what I had thus far and placed the frame I sculpted over it. For the bricks on the wall, I wanted to make life a little easier. The colorful chucks you see are glass pieces that I planned to mortar into place as bricks. The brick shapes you see are actually styrofoam pieces I formed and coated with resin. 


So I began to build it, brick by brick, using plaster as mortar.


One that was done I spray painted it to a uniform stone gray and dirtied it up with some black because a witch's house should have a cold and dark feeling, like her heart.


Once that was done, I had to figure out how to mount the electronics. My brother helped with this. I also cut a thin piece of plywood to mount the wall and window onto. The white panel in the middle of the photo below is a blue light panel that will illuminate a background scene just outside the window. Pretty snazzy!


I marked out where I would mount the various parts of the electronic stuff...


About this time, I purchased an actual miniature hourglass and made the handles. I only sculpted the handle once, then molded it with silicone and cast the three handles in resin. Then I inserted magnets into the top and bottom circular wood pieces so that the hourglass would lock to the table when in the frame.


Then I was back into painting mode. I added some reddish orange to her nose and set her hat on her head. This combo seemed to cast a spell on me...Hi, I'm corny. Note that the photos in the middle row she's wearing my Scarecrow's hat with a feather.


Next up, I did some paint tests for the frame... green or red?


Maybe it would be easier to judge if I layed out the other parts of the piece. Damn, now I have to figure the rest of it out!


GREEN!! Emerald City was saved! Near the bottom of the freshly painted frame you can see the small square area I cut out. This is where I will place the toggle switch to turn the lighting elements on and off. 


Who rang that bell ?!


My next step was to mount the set pieces onto the wall. I drove a drywall screw through the back and slid a piece of brass tubing over it, using 5 minute epoxy to permanently secure the parts. You can see the wires for the crystal ball are sticking up through the base.


Oh, Auntie Em! It's a full mock up!


Initially, I wasn't sure how to approach the crystal ball at first, so I went ahead and mounted the light into the base. Then I glued a semi-transparent picture of my Dorothy sculpture. 


All of the lights worked! I then secured the background image into the window frame. About this time, yet another lightbulb went off in my head (pardon the pun) and I wanted to add red velvet drapes to the background as well. But I'll get to those in a second.


These things must be done delicately... or you hurt the spell. So I moved along, using fiberfill and spray painting it a yellowish green color to simulate smoke also accentuating the green glow of light within the glass ball.


How about a little fire, Scarecrow?


The toggle ON/OFF switch also lights up.


Before securing the frame around the piece I checked the positions again.


The Witch looked good... The monkey was good...


...but I wanted to add drapes! 


If I only had a brain I wouldn't have almost forgotten about was the letter "Z" I placed on the bottom right of the frames of the other Oz pieces (the opening of the frame itself being the "O" in Oz). So I cast a resin "Z" from my Oz mold and took care of that. I attached it to the frame with epoxy and Magic Sculpt epoxy putty. Then a paint job and you'd never know it was separate.


Yes, let the joyous news be sung! The wicked old Witch at last is done!


Going so soon? I wouldn't hear of it... Why, my little party's just beginning...


Ding Dong,  the Witch is done!!


I'll get you my pretty.... and your little blog too!


And now, my beauties, something with poison in it...


Oh, what a world! What a world!


Oh, there's no place like home!


Once again, I hope you enjoyed this edition of the Zombienose Inner Workings. Please check out some of the links below and add me on social media so I know that somebody actually reads these blogs. Thanks!

THE LAST TIDBIT:

Please also check out the neat stuff at Circus Living!
http://www.circusliving.com/concessions 

Join Zombienose on Social Media!

Twitter:
https://twitter.com/zombienose

Instagram:
https://instagram.com/zombienose/

Facebook:
https://www.facebook.com/Zombienose

YouTube:
https://www.youtube.com/user/zombienosecollection

Tumblr:
http://zombienose.tumblr.com/

Sunday, October 11, 2015

Leopold

Welcome Ghouls, Goblins and occasional Zombienosers!

I've got a real treat for you - I hope. May I present...


Yep, the hookah king in the flesh, ...well, not exactly flesh. He's made of a combination of several materials - I got creative with some help from Home Depot. So grab a paper and pad, there will be plenty of notes to jot down on this one. I hope you'll enjoy....

T'was a dark and stormy night...


Not really. It was the middle of a sweltering summer. Anyway, after my Wizard of Oz series I had planned on doing a series of fairytale characters for quite a while, but this was one I particularly was looking forward to. Last year I had made my version of the Cheshire cat, named "Scruffy" and this was its follow up.

So I started with the large mushroom that the character would sit upon. I cut a short wood block and circular piece as a base armature for the mushroom.  I then proceeded to use "Great Stuff" gap filling spray foam to create the mass of the mushroom's top. You can find this at most home improvement stores like Home Depot.


Below you can see how high it foamed up after I left it alone for an hour or so.


I used a long razor blade and cut the foam into a mushroom shape. It's really a quick and cheap way to build mass. Then I screwed a hole through the bottom of my plaque base and screwed the stem to it. Easy!


Next I drilled a hole through the foam and into the wood stem. Then I jammed a thicker guage armature wire in it and secured it with 5 minute epoxy. I bent the wire forward and positioned it where the torso would sit then sprayed more foam to create the body and tail of the caterpillar.


Since I knew I would attached the arms and head later, I needed to shield part of the wire so I had room to attach them. I simply taped a paper towel around it so the foam would rise beyond that point.


I had the head already sculpted and set it on top after I carved down the foam a bit. It needed more refinement, which you can see below.


When I got it close, I attached the head to the armature that ran through the entire piece and also added some epoxy putty to attach the armature for the arms. He looked pretty wimpy at this point, but I knew I'd be adding some more material to bulk him up a bit. After that, I sealed the foam with an epoxy resin, which would also help to re-inforce the solidity of the piece and make it durable (pictured below, right).


I next cut some soft polyurethane foam and made a form for his chest and upper arms, added his hands (which are made from Sculpey and got a little too hot when baking) and slipped on his would-be sleeves for the hippy outfit I had planned. I was happy and satisfied with the results so far. 


To smooth out the sharp cuts on the foam I glued some panty hose around his belly and torso. It created a funny little collar that I left on longer than I had to because he was looking rather snazy. The black paint on his face is just to fill in the deeper crevasses.


At this point I gave him a preliminary base coat paint job. Then I pulled the panty hose over his head for protection from more foam work I would do. I added folded cardstock paper to act as gills for the mushroom and secured with more Great Stuff foam around the edge of it.


The next step was to even out a lot of the uneven surface. To start this, I added a layer of bondo over the body and mushroom then began the tedious task of sanding. 


Once I got it smooth I went ahead and based out the color, first on the body and hands, then on the mushroom. This allowed me to clearly see how rough it still was and I had to go ahead and add some spot putty to repatch some of the more offensive areas (and I don't mean his private parts). You can see the miniature hookah I built on the bottom right photo.


You know, after a day of sanding you really begin to hate life. This is what led me to go ahead and do the final paint job on Leopold's head. The result was encouraging so I decided I would keep the sanding hell going all the way to the finish line. This revealed some more touch up work I had to do to smooth out the body and mushroom. I used spot putty for these minor adjustments. I also went ahead and drilled a depression in the mushroom where I wanted the hookah to sit coiled in his tail.


After this I went ahead and based out the body and the mushroom again to see how it was looking. I painted some test patterns on his back because at this point I wasn't sure what kind of pattern to use. I also finished the paint job on his hands. I was working on several pieces at the same time so that's why you see the guy in the yellow bunny suit laying in the picture. His name is, "Skippy". 


So I went ahead and painted his body, still knowing I would have to refine the pattern on his back (which is my Zombienose moniker). The next step was to start adding his little hook feet and the grass on the artwork's wood base. I made the little feet with Magic Sculpt and also beefed up his chest a bit with it. Using Magic Sculpt I made little mounds on the base and pushed plastic grass into them. I also drilled a small hole in the base and slid a plastic flower in to fill out the scene. 


Finally, I was reaching the home stretch with this project. Around this time I decided I wanted him to wear a hippy shirt with some kind of vest as he was toking away on his hookah so I enlisted help to fabricate this. The shirt was fitted and looked good, but because the fabric was sheer the arm forms needed to be constructed to hide the armature wire. I painted his chest up to match to his head and body. I also started applying some red paint to the mushroom and blackened the base to visualize the completed piece. 


Once again, I was satisfied with the progress and relieved it would soon be finished. I added a bit of gravel and painted some spots on the mushroom head before I moved on to a set of glasses for my new friend. I made them simply and quickly using these metal curly trinkets I found at Joann's Fabric and Craft store. You'd be surprised at how much frustration can motivate your progress! Anyway, I just cut out the curly middle portion and bent the loop. I also found a bag of doll googly eyes, which I used for the lenses of the glasses.


To fit them I modeled the earhooks with Magic Sculpt and glued each side on before I bent an extra curve to use at the nose piece. The plastic doesn't actually magnify his eyes but the curvature distorts them enough that it appears to. 


Unfortunately, I didn't document the Hookah build as thoroughly as I should have. The base and body were simply made with miniature ceramic and glass bottles that were permanently attache together. The top portion was made with a couple of 1/12 scale plastic drinking glasses glued end to end. The flower dish was in a pile of trinkets I had and the finishing touches were done with other parts like the ball chain made for ID bracelets used for the trim. Looking down upon the caterpillar, you can also see the details of the pattern I painted on his back. Note: the hookah is NON-functional!


Nearly complete, I simply added more gravel by applying 5 min epoxy to the base and tossing the gravel onto it. I painted it to break up the color and added a few pebbles and rocks too. The final touch were the drawer handles I added in order to lift the artwork without actually touching any of the details. 


And finally... after all of that.... it was done. Don't smoke or you'll turn blue, kids.


Ta-da!


Here's the video:


THE LAST TIDBIT:

Also, please feel free check out my friend's short film on Youtube:


Friday, May 8, 2015

Oil Can!

Today we're off to see the wizard! The man behind the curtain - namely, yours truly.

I'm going to layout the process for how I made my own version of the Wizard of Oz's Tinman character. I had no yellow brick road to guide me, but I did have a deadline for a Wizard of Oz themed art show and this is what I came up with. So strap on your ruby slippers and grab your oil can - We're off to see the process of the wonderful Zombienose of Oz!


Since I had decided to make each of the principal characters from the Wizard of Oz the first step was to create a frame that would unify them. This is a bit of a process so please bear with me.

I used a cake pan to set the shape and sculpted the circular frame with Chavant oil based clay. The pan also served the purpose of blocking the hole so the piece could be molded easier. 


As you can see, after I completed the frame's form I roughed in the shape of the Z and gave it a dimensional shadow effect along the side. Hopefully you will notice that the opening in the frame itself is intended to be a large "O" and it spells Oz. When I was satisfied with the "Z" I scratched in some texture all over to give the frame a wood grain appearance and finally added my Zombienose symbol on what will be the bottom side of the frame.


Next, I molded the frame with silicone and an Ultracal jacket. After the mold was cured and removed I poured a fast-cast resin then trimmed out the excess with an X-acto knife. I cut some plywood for the backing then attached it. The inside was spray painted black and I have painted the frame with a not-so-emerald green. I made this compilation photo below to illustrate the process below.


Ok, now that's finally done! Let's get to the good stuff. 

One of the first parts I made for the Tinman was his axe. You can see the armature wire grasping the axe handle in this picture below. The wooden sign in the center of the photo was made for the Cowardly Lion sculpture.


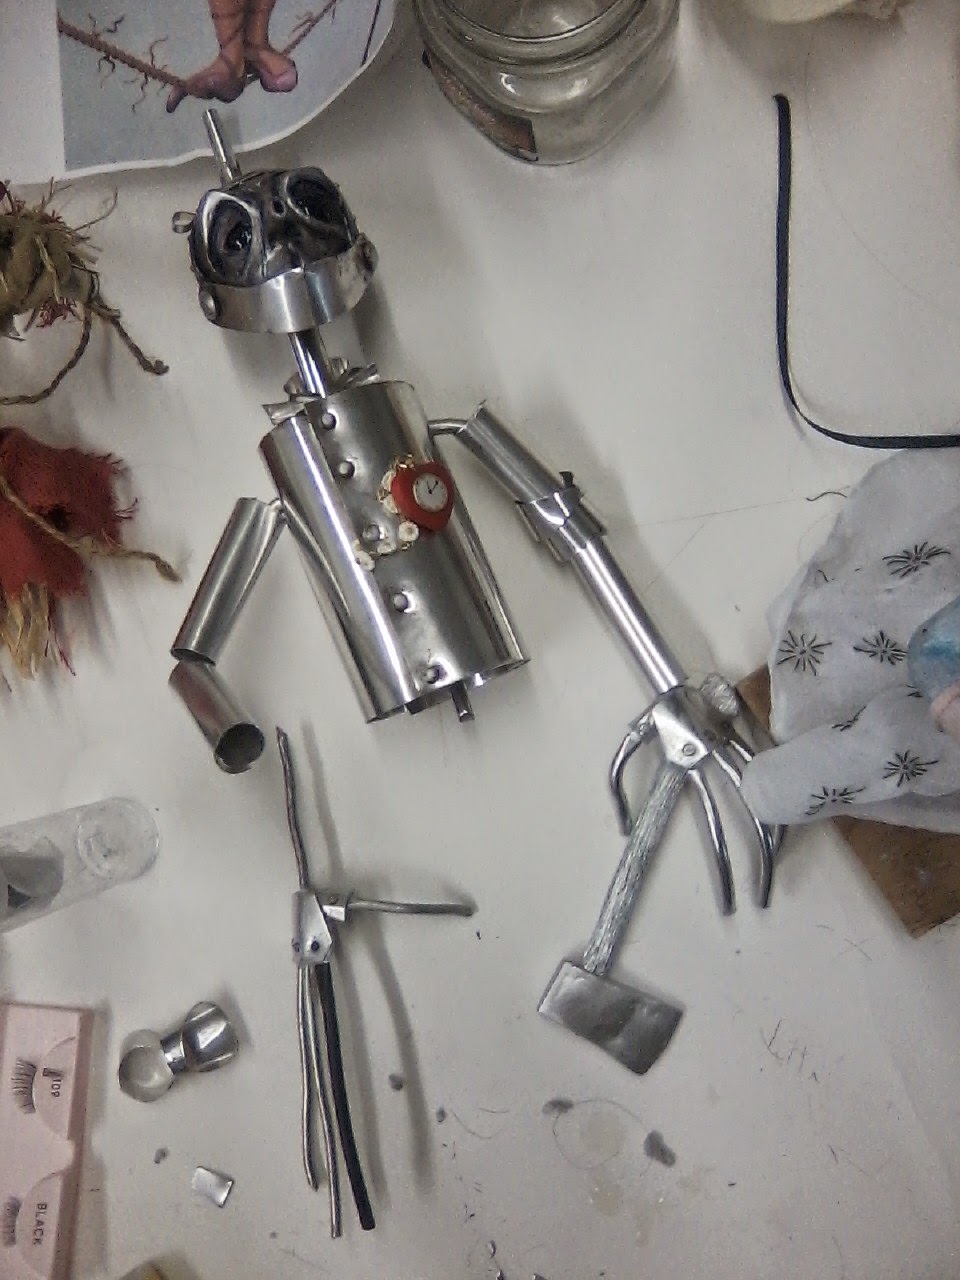
I essentially made his body by cutting it out from a thin sheet aluminum you can buy at a hardware store. I made a crude armature and wrapped some epoxy putty around it so I would have something to mount the piece into the back of the frame. Then I wrapped the cut aluminum around to make the torso. I punched some slits into the front and slid paper fasteners brads through them to appear as buttons. So now you know - he's the aluminum man, not tin. Below you can see his funnel hat along with the wire armature for his hands.
 

Then I wrapped those aluminum sheet pieces around in segments for the arms. 


I sculpted the head using Chavant (the same clay used for the frame) and molded it with silicone.


I molded all of the character's heads at the same time. My workspace was a mess and looked like it was hit by a tornado!


I then cast a copy of his head using resin and painted it with chrome spray paint. I  added some black to get an idea of what it would look like. Also, I glued on some small plastic jewels to serve as miniature rivets.


I created all of the characters at roughly the same time. I put them together to get an idea of how they would look.


To make his hands I used some epoxy putty and armature wire. I covered the epoxy putty with more pieces cut from the aluminum sheet then drilled some small holes and pushed tiny nails into them to appear as more rivets in his hands. I then slipped heat shrink tubing over the fingers and cut notches out of the tube to be the finger joints. I attached his funnel hat which I cut with that same aluminum sheet as well as his lower jaw. He's also got his ticking heart at this point, which was a holiday tree ornament.


At this point I began to construct apples using Super Sculpey. Below you can also see the Tinman's pelvis and thighs. My characters usually don't have legs because I like to think of them as spectors but sometimes I must make exceptions.


After painting up the apples I wrapped their wires around the branches I made. To make the branches I used a plastic bouquet of tiny ivy-looking leaves in which I built the bulk of the trunks up with Magic Sculpt. I then cut each of the ivy leaves into apple tree leaf shapes. This was very time consuming. Clicking my heels together three times may have been faster but I didn't have that option. 

Then I painted them.


The last thing I had to add was some prop boulders. I carved them from foam and spraypainted them. The effect worked well enough.


A last minute addition was a small spot of grass I wanted to add to the lower inside of the frame. This was made with fake black fur which I painted green.


Before I finalized the piece and mounted all the parts I added gold to the frame's green color in order to highlight the word "Oz" and some blueish shadows to his face. I also added gloss to the apples so they would shine and some rusting color to the Tinman's body.


I glossed the eyes and the piece was done. 


Hope you enjoyed! Thanks for reading, I appreciate your support. Anyway, the fellows were looking fine together. There's no place like home.


TADA!!

THE LAST TIDBIT:

Please check out the new music video from Malderine featuring my halloween bird costume!